Audio-only intercom systems are communication systems that allow users to speak and listen without video. They are commonly used at entrances, gates, service windows, elevators, help points, parking areas, offices, schools, hospitals, warehouses, industrial zones, security rooms, and emergency call stations. Compared with video intercoms, they focus on clear voice communication, simple operation, lower bandwidth, easier installation, and reliable day-to-day use.
In many projects, the main requirement is not to see the visitor or caller, but to confirm identity, provide assistance, open a door, coordinate staff, report an incident, or contact a control room quickly. In these cases, an audio-only intercom can be a practical and cost-effective solution.
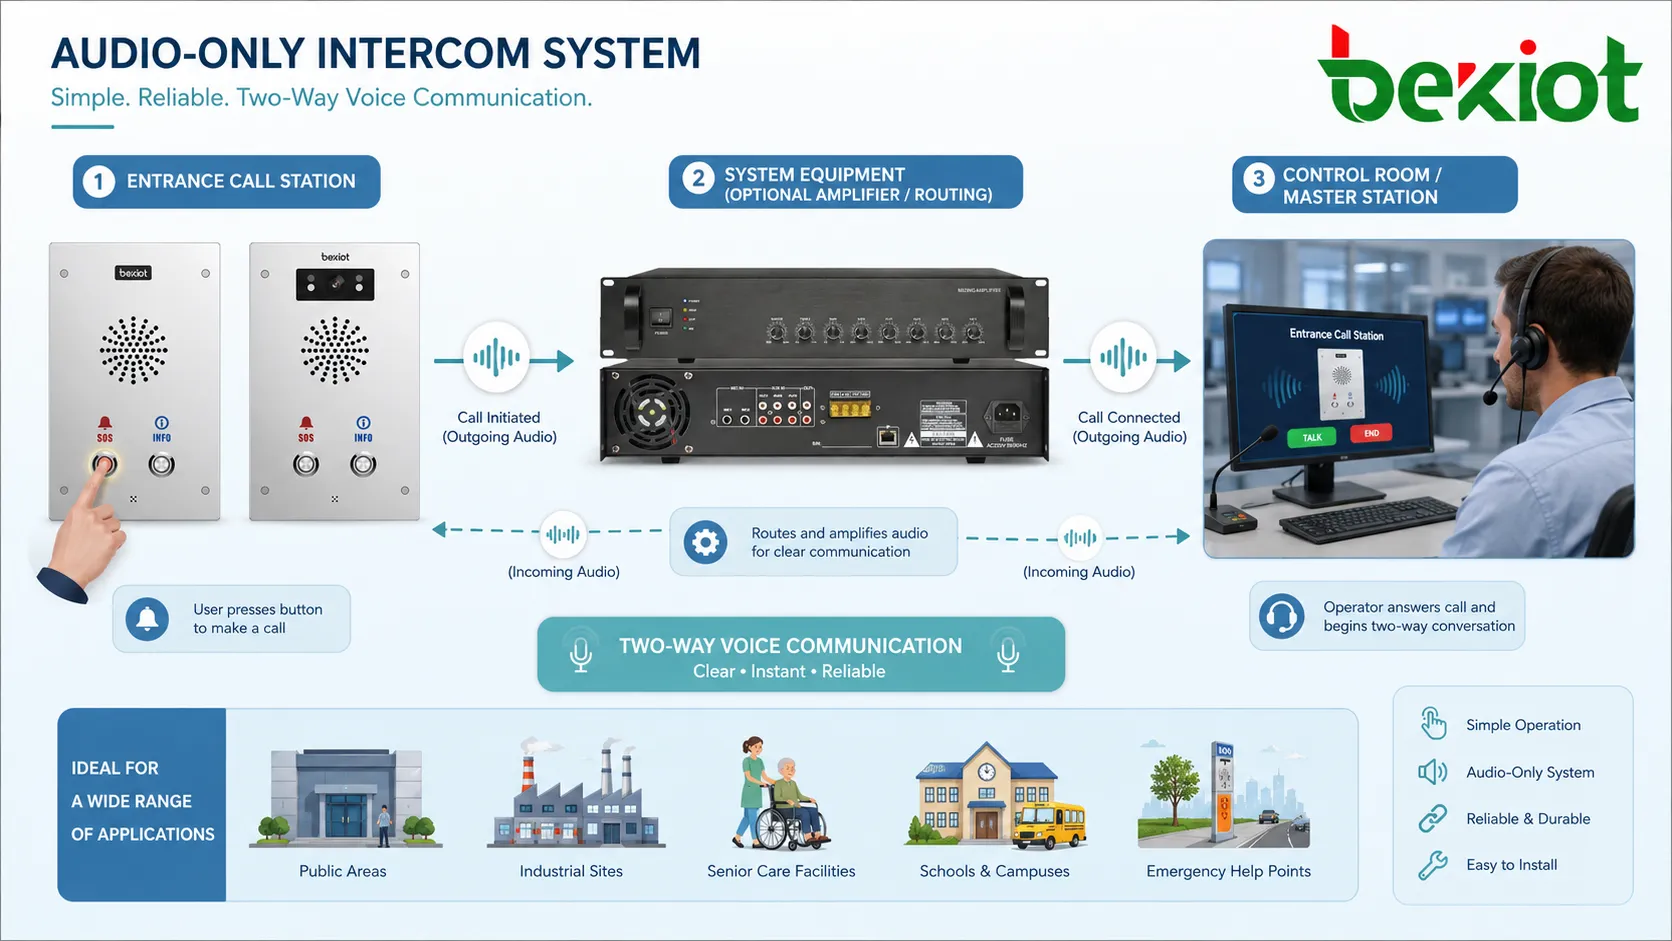
An audio-only intercom system is built around one essential function: fast, clear, and reliable two-way voice communication between a calling point and a receiving point.
Basic Meaning of Audio-Only Intercom Systems
An audio-only intercom system is a voice communication system that connects one or more calling stations with one or more answering stations. A user presses a call button, speaks into a microphone, and hears the response through a built-in speaker or handset. The receiving side may be a master station, desk phone, SIP phone, security console, control room panel, mobile app, or PBX extension depending on the system design.
Unlike video intercoms, audio-only systems do not transmit camera images. This makes them simpler, lighter on network resources, and easier to deploy in locations where video is unnecessary, restricted, or difficult to maintain.
Voice-First Communication
The key feature is voice-first communication. The system is designed to make talking and listening quick and dependable. A visitor can request access, a worker can call for help, a patient can contact staff, or a driver can speak with a gate operator without needing a screen.
Because the system focuses on voice, audio quality becomes very important. Microphone sensitivity, speaker volume, echo control, noise suppression, enclosure design, and installation position all affect the final user experience.
Simple User Interaction
Most audio-only intercom systems use simple operation. The user presses a button, waits for the call to connect, and speaks. In some systems, the call may connect automatically, or the operator may initiate a call to a specific station.
This simplicity is valuable in public areas, industrial sites, senior care facilities, schools, and emergency help points. Users do not need to navigate a complex touchscreen or video interface during stressful situations.
How the System Works
An audio-only intercom system works by capturing voice at one endpoint, transmitting it through a wired, IP, SIP, analog, or wireless connection, and playing it at another endpoint. The receiving user can speak back, creating a two-way conversation.
Depending on the system architecture, the audio path may be direct between two devices or routed through a central controller, PBX, SIP server, intercom server, access control platform, or dispatch system. Some installations also include door release, alarm input, recording, call forwarding, paging, and event logging.
Call Initiation
The call usually begins when a user presses the call button on an intercom station. The station sends a signal to the receiving device or communication server. The system then alerts the operator through ringing, flashing indicator, pop-up notification, or call queue display.
For entrance and gate applications, the operator may speak with the visitor and decide whether to unlock the door, open the gate, or transfer the call. For help-point and emergency applications, the call may be routed directly to a security desk or control room.
Audio Capture and Playback
The intercom station uses a microphone to capture the user’s voice and a speaker or handset to play the response. In hands-free systems, acoustic echo cancellation may be needed to prevent the speaker output from returning into the microphone.
In noisy locations, the device may need a stronger speaker, directional microphone, noise reduction, or handset design. The goal is not only to connect the call, but to make the conversation understandable under real conditions.
Call Routing
Call routing defines where the call goes. A single door station may call one reception desk. Multiple help points may call a security center. Industrial stations may call a control room, shift supervisor, or maintenance team.
IP and SIP-based intercom systems can support more flexible routing. Calls may be sent to SIP extensions, ring groups, mobile clients, or dispatch consoles. This makes audio-only intercoms easier to integrate with modern communication systems.
Main Components
A complete audio-only intercom system usually includes calling stations, answering stations, communication controllers, power supply, network or signal cabling, mounting accessories, and optional linkage devices.
Intercom Call Station
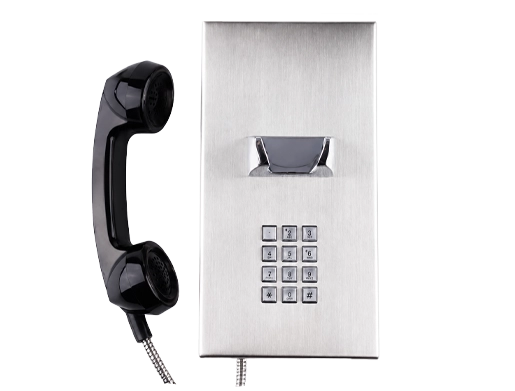
The call station is the device used by the caller. It may be wall-mounted, pole-mounted, flush-mounted, desktop-mounted, weatherproof, vandal-resistant, explosion-proof, or designed for indoor service points.
The call station typically includes a microphone, speaker, call button, status indicator, and enclosure. Some models include relay output for door release, alarm input, keypad, RFID reader, or emergency button integration.
Answering Station
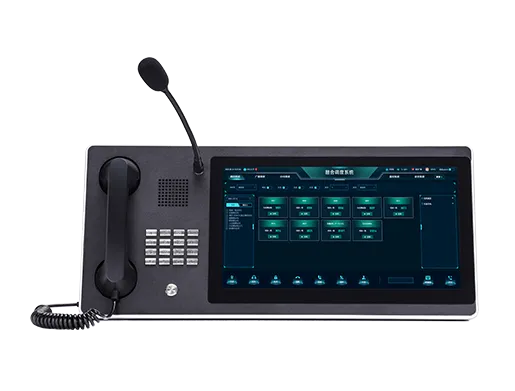
The answering station is used by the operator or staff member. It may be a master intercom station, desk phone, SIP phone, softphone, security console, reception terminal, or control room system.
The answering side should be easy to use because operators may handle calls while managing other tasks. Clear call identification, location display, call history, and quick action buttons can improve response speed.
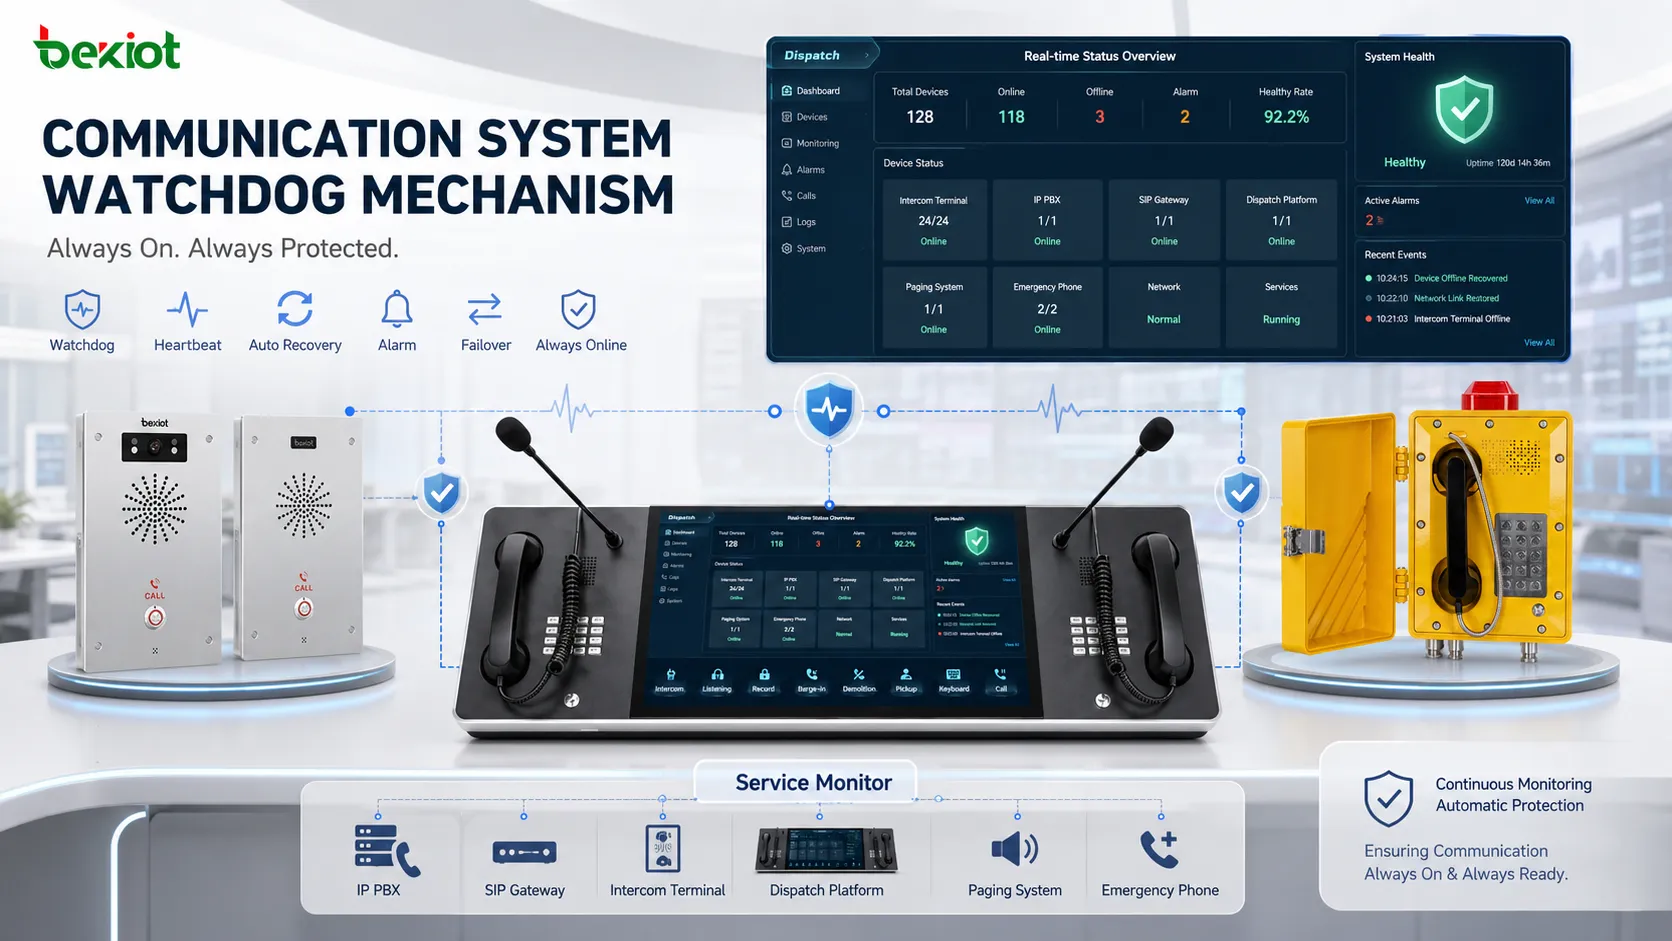
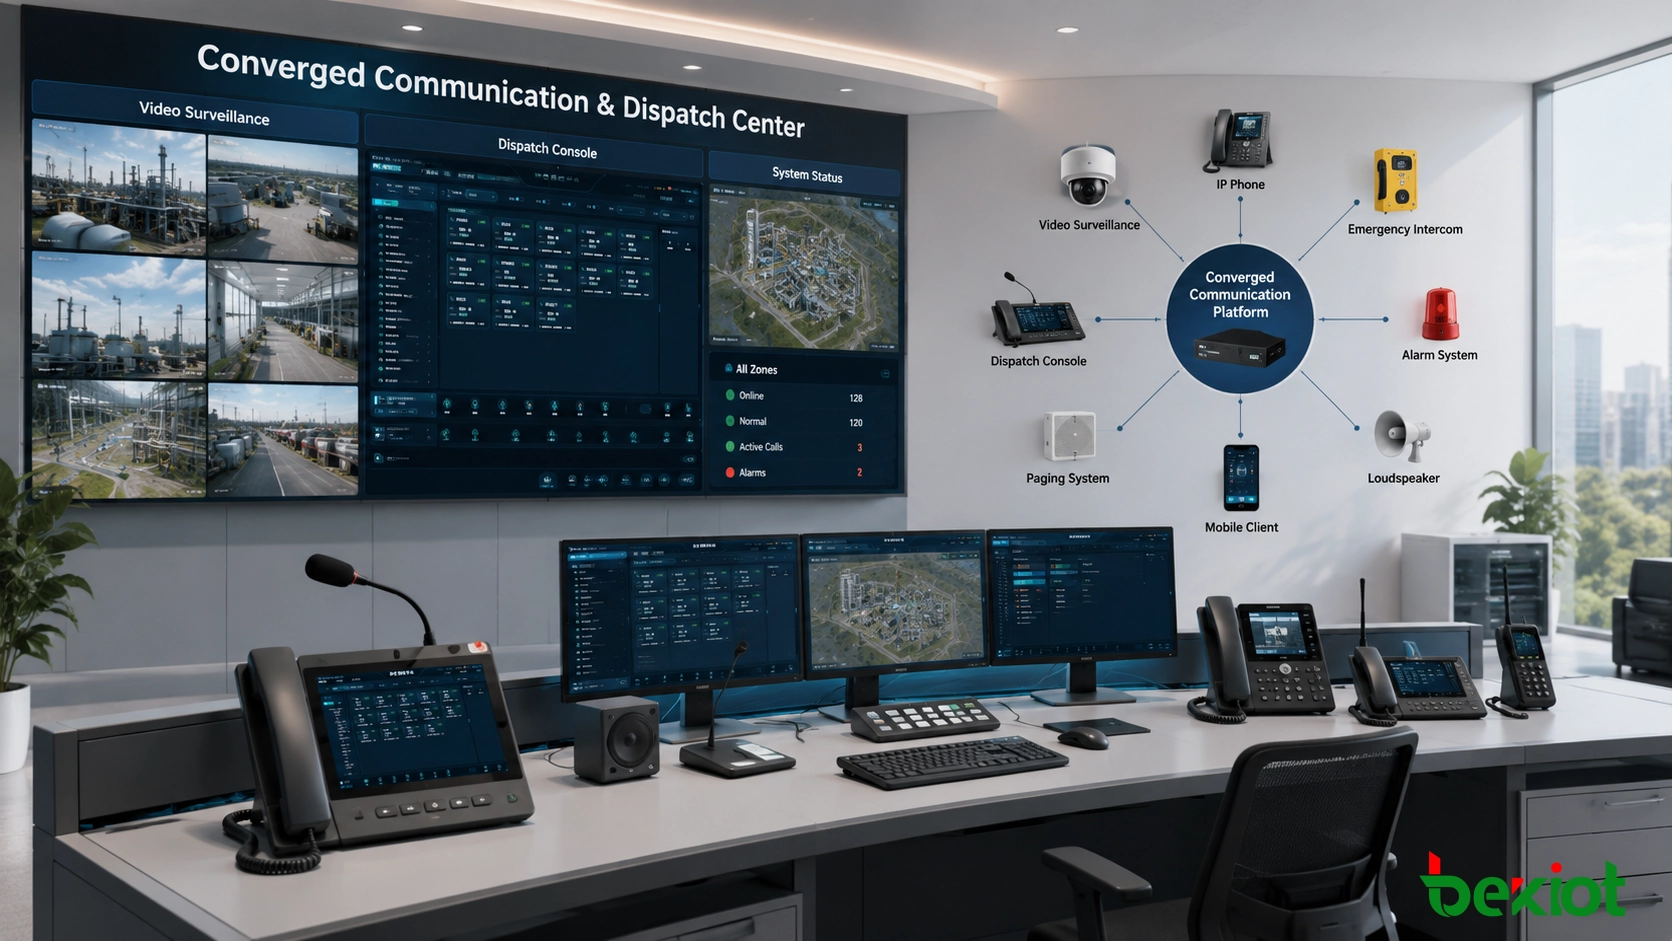
Control and Routing Platform
Some systems work point-to-point, while others use a central platform for call routing, device management, recording, scheduling, and integration. Larger facilities usually benefit from centralized management.
A central platform can help administrators manage many devices, assign call destinations, monitor device status, review logs, and connect intercom calls with access control or security workflows.
Power and Network Infrastructure
Audio-only intercoms may use analog wiring, dedicated intercom cabling, Ethernet, PoE, SIP networks, or wireless links depending on the product type. IP intercoms often use Power over Ethernet, which simplifies wiring because one cable can provide both network connection and power.
For critical sites, backup power should be considered. If the intercom is used for emergency contact or access control, it should remain available during power interruptions where required.

Key Advantages
Audio-only intercom systems remain widely used because they are practical, direct, and suitable for many environments. They provide communication without the added complexity of video transmission.
Lower Cost and Simpler Deployment
Audio-only systems are usually more economical than video intercom systems. They do not require cameras, video displays, higher video bandwidth, video storage, or camera maintenance.
This makes them suitable for projects where voice communication is enough. Examples include staff entrances, service windows, small gates, warehouse doors, elevator communication points, internal rooms, and emergency help stations.
Reduced Bandwidth Requirement
Voice requires much less bandwidth than video. This is useful in older networks, remote sites, industrial facilities, low-bandwidth links, or systems with many endpoints.
Lower bandwidth also improves reliability in some cases. If the network is limited, an audio-only intercom may remain more stable than a video-based solution.
Better Privacy in Some Scenarios
Some locations need communication but do not need visual monitoring. Audio-only systems can support privacy-sensitive areas where video cameras are unnecessary or inappropriate.
This may include patient areas, staff-only rooms, service counters, internal offices, or locations where local policy limits camera use.
Easy Operation for Users
A single call button and clear voice path make the system easy for visitors, staff, drivers, patients, students, or field workers to use. This is especially important when users are unfamiliar with the facility.
In emergency or assistance scenarios, simple operation can reduce hesitation and improve response time.
Reliable Voice Communication
When designed correctly, audio-only intercom systems can provide dependable voice contact in places where mobile phones are inconvenient, unavailable, restricted, or unreliable.
Fixed intercom points also provide location clarity. When a call comes from a known device, the operator can identify where assistance is needed.
Common Applications
Audio-only intercom systems are used in both everyday service workflows and safety-related communication points. Their value is strongest when people need quick voice contact without needing video.
Building Entrances and Gates
Entrances and gates use audio intercoms to let visitors speak with reception, security, or residents. The operator can verify the request and release the door or gate when authorized.
This application is common in offices, apartments, factories, parking areas, schools, warehouses, and restricted facilities. Audio-only design is often enough when visual verification is handled by staff, badge systems, or separate cameras.
Help Points and Emergency Stations
Help points use audio intercoms to connect users with security staff, control rooms, or service teams. They may be installed in parking lots, campuses, transport stations, elevators, tunnels, parks, and industrial areas.
For emergency assistance points, Becke Telcom BHP-SOS intercom series can be considered as a field call solution where one-touch help, voice contact, and alarm linkage are required in facility or industrial communication projects.
Healthcare and Care Facilities
Hospitals, clinics, nursing homes, and care facilities use audio intercoms for nurse stations, patient rooms, isolation areas, service desks, and staff coordination. Voice-only communication can be enough for many routine support calls.
In these environments, clear audio, easy cleaning, reliable call indication, and simple operation are more important than decorative features.
Industrial and Warehouse Sites
Factories, warehouses, utility rooms, and production areas use audio intercoms to connect workers with control rooms, maintenance teams, supervisors, or security posts.
Industrial environments may require rugged enclosures, high-volume speakers, weather protection, dust resistance, and noise-aware installation. Device placement should consider machinery noise and worker movement.
Elevators and Public Facilities
Elevator intercoms and public assistance points provide voice contact when users need help. These systems may connect to building management, security, maintenance staff, or an emergency monitoring center.
Reliability is essential because users may depend on the intercom during equipment failure, access difficulty, or personal emergency.
Internal Room-to-Room Communication
Audio-only intercoms can support room-to-room communication in offices, workshops, laboratories, schools, control rooms, clean rooms, and restricted areas.
They reduce unnecessary walking and help teams coordinate quickly when phone use is inconvenient or when a fixed communication point is preferred.

Installation Planning Before Deployment
Successful installation begins before any device is mounted. The project team should understand the communication purpose, site conditions, call routing, power supply, cable path, mounting location, and future maintenance needs.
Define the Communication Scenario
The first question is why the intercom is needed. An entrance intercom, emergency help point, warehouse call station, elevator intercom, and internal office intercom have different requirements.
Defining the scenario helps choose the right device type, call destination, mounting height, audio level, enclosure, button style, and integration method.
Confirm Call Destination
Every call station needs a clear destination. The call may go to reception, a security desk, a control room, a SIP extension, a ring group, a mobile client, or a dispatch platform.
Backup routing should also be planned. If the main operator is unavailable, the call may need to forward to another station, another shift desk, or an after-hours number.
Check the Acoustic Environment
Audio performance depends heavily on the environment. A quiet office door needs different settings from a loading dock or factory floor. Background noise, echo, wind, traffic, machinery, and speaker distance should be considered.
In noisy areas, choose devices with suitable microphone pickup, speaker output, acoustic echo control, and enclosure design. Installation position may matter as much as device specification.
Review Power and Cabling
For IP intercoms, Ethernet and PoE availability should be checked. For analog systems, cable type, distance, power supply, and controller compatibility must be confirmed.
Cable routing should avoid strong interference sources where possible. Outdoor and industrial cable paths should consider moisture, mechanical protection, grounding, lightning protection, and maintenance access.
General Installation Steps
The following steps describe a typical installation workflow. Actual installation should follow the manufacturer’s manual, local electrical rules, building safety requirements, network policy, and site-specific procedures.
Step One: Site Survey
Inspect each installation location. Check wall or pole structure, weather exposure, lighting, noise, user approach direction, accessibility, cable route, network availability, and operator visibility.
The survey should also confirm whether the device is for general service, access control, emergency help, industrial use, or public interaction. This affects mounting and configuration decisions.
Step Two: Device Selection
Select the intercom station based on environment and function. Indoor stations may focus on appearance and convenience. Outdoor stations may need weather resistance and vandal protection. Industrial stations may need rugged materials and higher audio output.
If door release, alarm input, relay output, SIP registration, PoE, recording, or remote management is required, these features should be confirmed before purchase.
Step Three: Cabling and Power Preparation
Prepare cable routes and power supply before mounting the device. For PoE devices, verify switch capacity and network port availability. For non-PoE devices, confirm the correct power adapter or power supply rating.
Label cables clearly. This helps future maintenance and prevents confusion when multiple call stations are installed in one facility.
Step Four: Mounting
Mount the call station at a height and position suitable for users. The microphone and speaker should not be blocked by walls, covers, signs, or structural obstacles.
Outdoor devices should be sealed properly according to the installation manual. Cable entries should be protected against water ingress and mechanical damage.
Step Five: Network or Controller Configuration
For IP or SIP systems, configure network parameters, SIP account, server address, call destination, codec, call timeout, volume, relay settings, and device name. For analog systems, configure controller ports, station numbers, and call routing.
Device naming should include location information. A call from “Gate 2 North Entrance” is much more useful than a call from “Device 004.”
Step Six: Audio Testing
Test two-way audio under real conditions. Check microphone pickup, speaker volume, echo, background noise, call connection time, call release, and operator response.
Testing should include both normal conversation and expected worst-case conditions, such as machinery running, outdoor wind, traffic noise, or busy reception hours.
Step Seven: Function and Integration Testing
If the system includes door release, alarm input, recording, call forwarding, status monitoring, or event logging, each function should be tested. Do not assume integration works only because the voice call works.
For emergency or help-point systems, test the full workflow from button press to operator response, event record, and reset process.
| Installation Stage | Main Task | Key Checkpoint |
|---|---|---|
| Site survey | Confirm location and environment | Noise, weather, mounting, cable route, user access |
| Device selection | Choose suitable station type | Indoor, outdoor, rugged, SIP, PoE, relay, emergency function |
| Cabling | Prepare signal and power path | Network, PoE, power rating, cable protection, labels |
| Configuration | Set call destination and system parameters | SIP account, routing, timeout, volume, device name |
| Testing | Verify audio and workflow | Two-way voice, noise, relay, logs, forwarding, reset |
Configuration and Operation Tips
After installation, configuration determines how well the system supports daily operation. A technically connected device may still create poor user experience if call routing, volume, timeout, or naming is not planned well.
Set Practical Ring Time
If the ring time is too short, calls may be missed. If it is too long, users may wait without knowing whether anyone will answer. The correct setting depends on staff availability and site workflow.
For important call points, escalation routing should be considered. If the first destination does not answer, the call can move to a backup operator or group.
Adjust Volume Carefully
Speaker and microphone levels should be adjusted in the real environment. A high speaker volume may cause echo, while a low volume may be hard to hear outdoors or in industrial areas.
Volume settings should balance clarity, privacy, and comfort. In public locations, avoid making private conversations too audible to nearby people.
Use Clear Location Names
Each station should have a clear name in the system. Location-based naming helps operators respond faster and reduces confusion during emergencies.
Good examples include “Warehouse West Door,” “Parking Help Point B2,” “Main Gate Visitor Intercom,” or “Elevator Machine Room.”
Plan After-Hours Handling
Many intercom points remain accessible after normal working hours. The system should define what happens when reception or security is unavailable.
Options may include call forwarding, voicemail, duty phone routing, remote monitoring center connection, or scheduled routing changes.
Maintenance and Testing
Audio-only intercom systems should be checked regularly. A device may look normal but fail to connect, produce weak audio, or lose network registration if maintenance is ignored.
Routine Function Check
Press the call button and confirm that the call reaches the correct destination. Check two-way audio, call release, status indicator, and any linked relay or alarm output.
Routine checks are especially important for emergency help points, elevators, gates, and remote locations where the device may not be used every day.
Inspect Physical Condition
Check the enclosure, button, microphone opening, speaker grille, cable entry, mounting screws, labels, and signs. Outdoor devices should be inspected for water ingress, corrosion, dirt, insects, vandalism, and physical impact.
Blocked microphone or speaker openings can reduce audio quality even when the electronics are working normally.
Review Logs and Missed Calls
If the system supports call logs, review missed calls, failed registrations, offline devices, call duration, and abnormal events. Logs can reveal problems before users complain.
For help-point and security applications, logs also support response review and maintenance planning.
Update Configuration Records
When call destinations, staff roles, SIP accounts, network settings, or access rules change, update the documentation. Outdated records make troubleshooting slower and increase the chance of wrong routing.
Configuration backup is useful for IP and SIP-based systems. If a device fails, the replacement can be restored faster.
Common Mistakes to Avoid
One common mistake is treating audio-only intercoms as simple speakers and microphones without considering the surrounding noise. Poor placement can make even a good device difficult to use.
Another mistake is forgetting backup call routing. If the only answering station is unattended, calls may be missed and users may lose trust in the system.
A third mistake is installing outdoor devices without proper sealing, cable protection, or weather consideration. Water ingress and corrosion can shorten service life.
A fourth mistake is using unclear device names. Operators need to know exactly where the call is coming from, especially in multi-building, multi-gate, or emergency environments.
Best Practices for Reliable Deployment
A good audio-only intercom system should be designed around people, not only devices. The caller should know how to use it, the operator should know where the call comes from, and the system should support the expected response.
Design Around the User
Install the call station where users naturally approach. The button should be visible, reachable, and clearly labeled. If the intercom is for emergency help, the purpose should be obvious.
Accessibility should also be considered. Mounting height, button size, signage, lighting, and audio level can all affect usability.
Protect the Full Communication Path
The intercom station, network switch, server, answering device, power supply, and routing platform all form one communication path. If one part fails, the service may fail.
For important points, consider backup power, redundant routing, device monitoring, and regular testing.
Test with Real Conversations
Do not test only with short phrases such as “hello.” Use real conversation scenarios, including visitor questions, emergency requests, background noise, and operator instructions.
This reveals whether the system is truly understandable in daily use.
Keep the System Manageable
As the number of stations grows, management becomes important. Use clear naming, grouped routing, configuration backups, maintenance schedules, and device status monitoring.
A manageable system is easier to expand and less likely to become confusing over time.
FAQ
Can audio-only intercoms work with existing phone systems?
Yes, many IP or SIP-based intercoms can call PBX extensions, SIP phones, softphones, or ring groups. Compatibility depends on protocol support, codec settings, network design, and call routing rules.
How can audio quality be improved in noisy areas?
Use proper mounting position, suitable speaker volume, directional microphone design, noise reduction, acoustic shielding, handset-style stations, or nearby visual indicators. Testing should be done while the site is operating normally.
Should every intercom call be recorded?
Not always. Recording depends on security needs, privacy rules, legal requirements, storage capacity, and organizational policy. If recording is used, users and operators should follow applicable notice and consent rules.
What happens if the answering station is busy?
The system can be configured to ring another extension, route to a group, forward after timeout, play a prompt, or log the missed call. Backup routing is important for service and emergency points.
Can audio-only intercoms control doors or gates?
Yes, many systems support relay output for door release or gate control. The access control logic should be designed carefully so that voice communication and unlocking permission are handled securely.
How often should emergency intercom points be tested?
Testing frequency depends on site policy, risk level, and regulatory requirements. Critical help points, elevator phones, security posts, and emergency stations should be tested regularly and documented.