
OpenVPN setup guide for SIP phones covering VPN basics, Ubuntu and Windows server deployment, certificate generation, client configuration, phone upload steps, connection status, and VPN NAT usage.
A virtual private network, or VPN, is a secure network connection established over a public network. Unlike an ordinary network connection, it uses dedicated tunneling protocols to provide data encryption, integrity verification, and user authentication. This helps prevent transmitted information from being viewed, modified, or copied. From the perspective of network connection security, it is similar to building a private leased-line network over a public network. Because this private line is logical rather than physical, it is called a virtual private network. A VPN system includes a VPN server, VPN clients, and tunnels. Since transmission over the Internet is much less expensive than leasing a dedicated line, VPN technology allows enterprises to transmit private and confidential information securely and economically over the Internet.
This guide introduces VPN configuration with OpenVPN. OpenVPN is an open-source third-party VPN configuration tool that can use existing devices to build a VPN application gateway.
OpenVPN is an open-source third-party VPN configuration tool that can use existing devices to build a VPN application gateway. The following sections describe server deployment and configuration on Ubuntu and Windows operating systems.
2.1.1 Install the OpenVPN server
Enter the following commands in Ubuntu:
sudo apt-get -y install openvpn libssl-dev openssl
sudo apt-get -y install easy-rsa
2.1.2 Certificate generation
Run the following commands to generate the initial certificate configuration required for OpenVPN to operate normally:
sudo mkdir /etc/openvpn/easy-rsa/
sudo cp -r /usr/share/easy-rsa/* /etc/openvpn/easy-rsa/
sudo su
sudo vi /etc/openvpn/easy-rsa/vars
----->Modify the certificate settings as required:
export KEY_COUNTRY=”CN”
export KEY_PROVINCE=”BJ”
export KEY_CITY=”BeiJing”
export KEY_ORG=”fanvil”
export KEY_EMAIL=”fanvil@fanvil.com”
export KEY_OU=”fanvil”
export KEY_NAME=”server”
Run vars: source vars
If this is the first run, clear all files: ./clean-all
Generate the CA certificate: ./build-ca
Generate the server certificate: ./build-key-server server
Generate the client certificate: ./build-key client
Generate the Diffie-Hellman key library. ./build-dh
Configure the server environment and place the corresponding certificate configuration files into the specified directory:
cp keys/ca.crt /etc/openvpn/
cp keys/server.crt keys/server.key keys/dh2048.pem /etc/openvpn
mv /etc/openvpn/dh2048.pem /etc/openvpn/dh1024.pem
cp keys/client.key keys/client.crt /etc/openvpn/
cp /usr/share/doc/openvpn/examples/sample-config-files/server.conf.gz /etc/openvpn/
cd /etc/openvpn
gzip -d server.conf.gz
cp /usr/share/doc/openvpn/examples/sample-config-files/client.conf /etc/openvpn/
Start the server:
/etc/init.d/openvpn restart
2.3.1 Install the OpenVPN server
Search online and download the Windows version of OpenVPN. This setup uses OpenVPN GUI. Double-click the downloaded software and install it with the default options. Make sure that the easy-rsa component is selected during installation. The default path is C:\Program Files\OpenVPN.
2.3.2 Certificate generation
Before performing the operation, initialize the environment first:
Modify the following part of C:\Program Files\OPENVPN\easy-rsa\vars.bat.sample according to your own situation:
set HOME=C:\Program Files\OPENVPN\easy-rsa
set KEY_COUNTRY=CN #(country)
set KEY_PROVINCE=BEIJING #(province)
set KEY_CITY= BEIJING #(city)
set KEY_ORG=WINLINE #(organization)
set KEY_EMAIL=admin@winline.com.cn #(email address)
The content beginning with # above is a comment. Do not write it into the file.
Open cmd with administrator privileges, enter DOS, and run the following commands to enter the
openvpn\easy-rsa directory:
init-config
vars
clean-all
Generate the root certificate: build-ca (press Enter all the way to use the default configuration)
Generate the Diffie-Hellman key library: build-dh
Generate the server certificate: build-key-server server (press Enter all the way to use the default configuration)
Generate the client certificate: build-key client (press Enter all the way to use the default configuration)
2.3.3 Start the server
All generated keys are stored in the OpenVPN\easy-rsa\keys directory.
Copy the generated certificates to the OpenVPN\config directory.
Copy the server configuration file under OpenVPN\sample-config to the OpenVPN\config directory, and then start the OpenVPN application.
In the OpenVPN installation directory, use notepad++ to open the server.ovpn or server.conf file. A server-side file example is shown below:
port 1194 # This port is the assigned port allocated by IANA for OpenVPN and can be changed as needed
proto udp # tcp can also be selected
dev tun
ca ca.crt
cert server.crt
key server.key
dh dh1024.pem
server 10.8.0.0 255.255.255.0 # Virtual LAN segment setting; modify it as required
ifconfig-pool-persist ipp.txt
keepalive 10 120
client-to-client
comp-lzo
max-clients 100
persist-key
persist-tun
status openvpn-status.log
verb 3
For more detailed information, refer to the OpenVPN Wiki.
The client here refers to devices that support OpenVPN. To allow the SIP phone to connect to the OpenVPN server, certificate files are required.
First, edit the client configuration file client.ovpn or client.conf. A client configuration file example is shown below:
client
dev tun
proto udp
remote 192.168.1.135 1194 # server domain/IP and port
resolv-retry infinite
nobind
persist-key
persist-tun
ca ca.crt
cert client.crt
key client.key comp-lzo
verb 3
You can modify the client configuration according to the server-side configuration.
Then export the previously generated client files ca.crt, client.crt, and client.key for use during SIP phone upgrade.
Log in to the phone web page and click Network->VPN in sequence. In the OpenVPN file field, upload client.ovpn, client.key, client.crt, and ca.crt one by one. After the upload is complete, the OpenVPN file field displays the size of the uploaded certificate files, as shown below: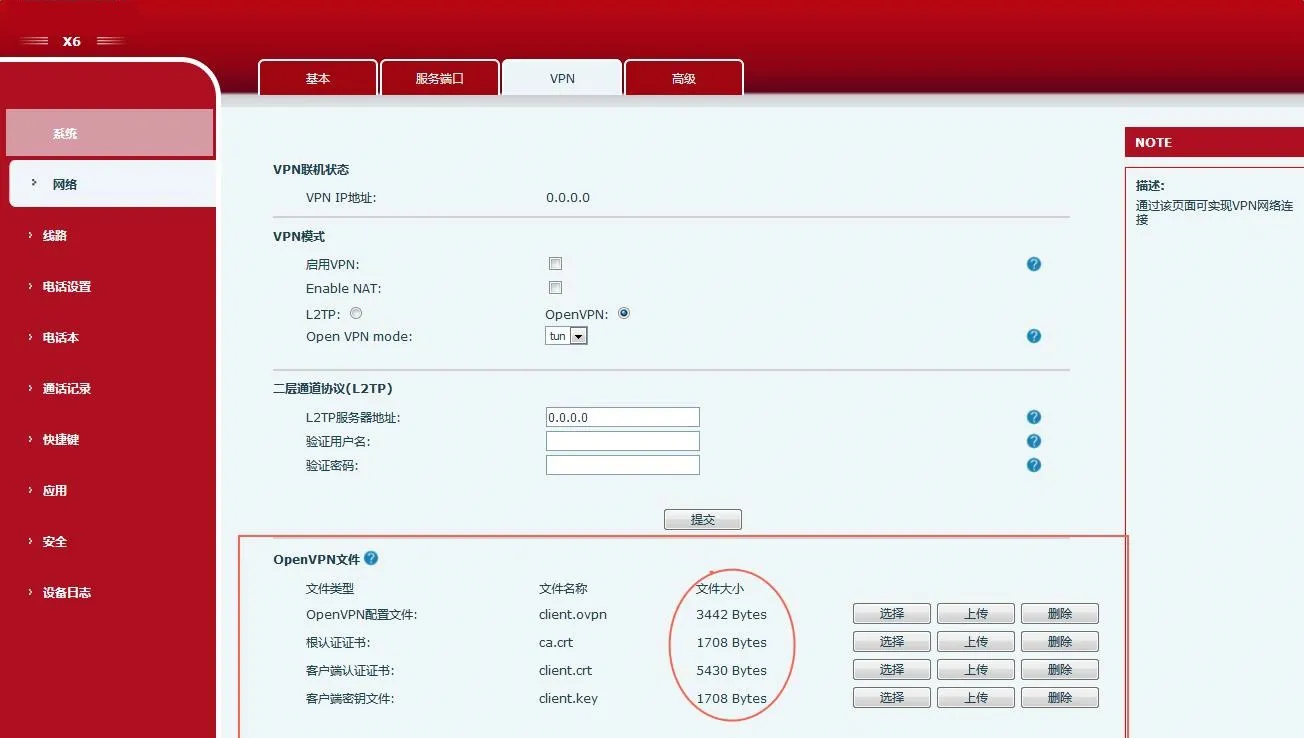 Open the VPN configuration page, select Open VPN as the VPN mode, enable VPN, and click the Submit button. After the server is connected successfully, the IP address obtained by the phone is displayed in the VPN online status field on the VPN page. As shown below, the obtained IP address is 10.8.0.10.
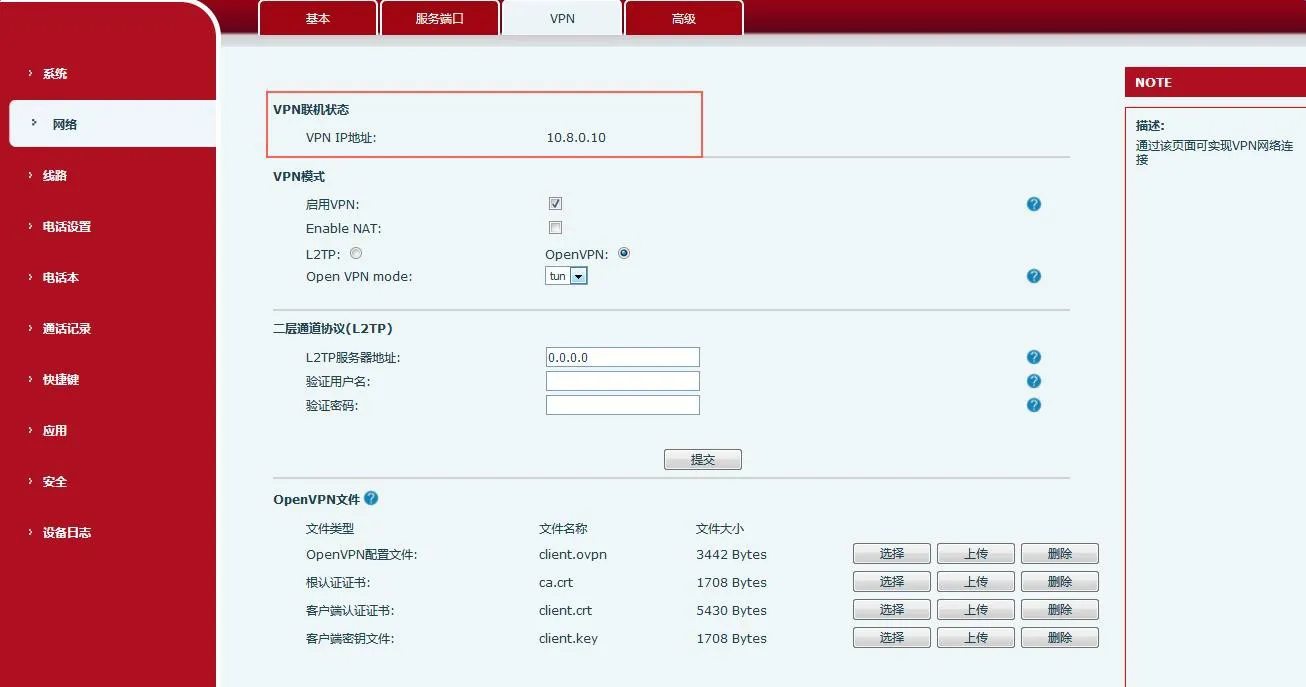
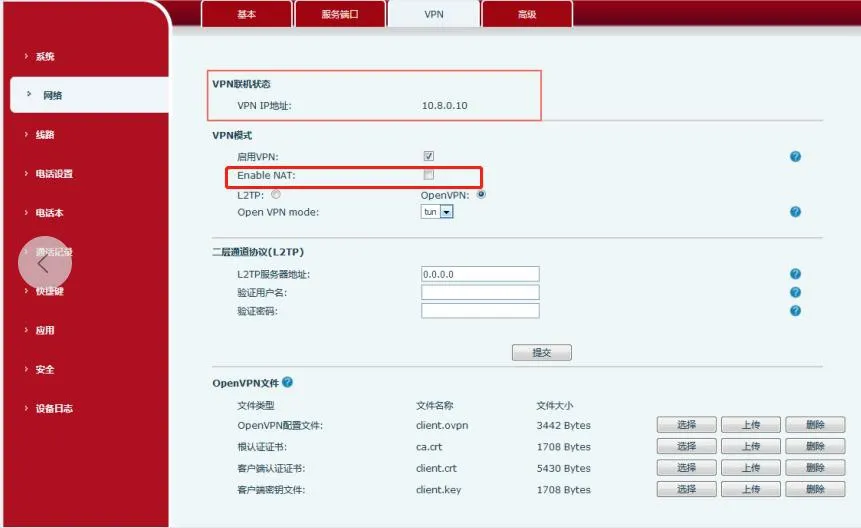
Usage method:
Import the VPN certificates into the phone, enable Enable VPN and Enable NAT, and connect the PC to the phone LAN port. The PC gateway needs to be set to the phone IP address. At this point, the PC can access the phone VPN.
PC ping10.8.0.10 can ping successfully, and ping www.baidu.com can also ping successfully. 10.8.0.10 is the VPN IP address.
Note: Currently supported models include J3G/X3U/X3SG/J1P and X5S/X6/X7/X7C/X210/X210i. Phones X3S/X4/X7 are not supported at this time.