
Learn how to perform an echo self-test on industrial intercoms and access control devices using Active URI, HTTP API, time plan scheduling, or SIP messages to verify speaker and microphone status.
In some industry applications, the device speaker and microphone may need to be checked automatically. This is done through the echo self-test function. The principle is simple: the device plays audio through the speaker and records it through the microphone to verify whether both the speaker and microphone are working correctly. The sections below explain how to perform the voice self-test on industry devices.
Access control, intercom, and other industry-specific terminals.
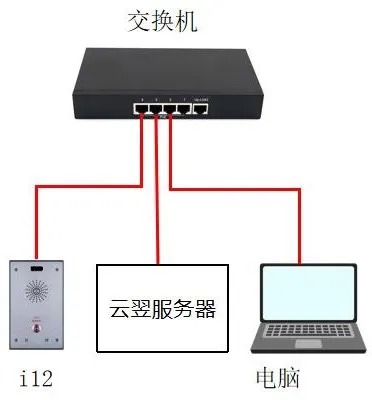
① One intercom device (the i12 is used as the example in this guide), one PoE switch or DC power supply, and one Yunyi server. Connect the device to the switch.
② One configuration PC and one server connected to the same switch, with confirmed network communication between the PC and the device.
Connect the i12 to the switch, connect the server to the same switch, and connect the PC to that switch as well, making sure the PC and the device can communicate over the network, as shown below.
The echo self-test can be implemented in several different ways. Each method is explained below.
Active URI works by sending an HTTP GET request from a remote console. The device has a built-in HTTP server that parses the request and executes the command, allowing remote control of the device.
The test format is:http://Device_IP/cgi-bin/ConfigManApp.com?key=ECHO_TEST
① Device IP: the IP address of the device being tested. In this example, the IP address is 172.18.8.15.
② Returned result: if both the speaker and microphone are connected and working properly, the result will be success. If the speaker or microphone is disconnected or damaged, the result will be Failure.
Example: enter the following address in the browser address bar. If the device speaker and microphone are working normally, the returned result will be success, as shown in Figure 1.
http://172.18.8.15/cgi-bin/ConfigManApp.com?key=ECHO_TEST

The HTTP API is designed for integration with third-party applications or management systems. The device acts as an HTTP server and provides API services through the URL http://ip/xmlservice. A third-party application acts as the HTTP client and sends an HTTP POST request with XML content.
The HTTP API request format is as follows:
① Client -> Server Request:
This indicates that the requested command is the echo self-test.
② Server -> Client Response:
③ Returned result: if both the speaker and microphone are connected and working normally, the result is success. If the speaker or microphone is disconnected or damaged, the result is Failure.
④ Example: you can use Postman or ApiPost for testing. Send a POST request to http://Device_IP/xmlservice, enter the correct XML request body, then click Send. If the request is correct, the device will return the test result successfully, as shown in Figure 2.

You can add a voice self-test item in the time plan settings. The device will perform the self-test automatically at the configured time or during the configured time period, and report the result through the Action URL mechanism.
Log in to the device web interface, then go to Intercom Settings --- Time Plan --- Time Plan Rules and create a new time plan, as shown in Figure 3.
① Execution Type: select Voice Self-Test.
② Execution Time: select the required time period. The device will perform the self-test during that configured period.
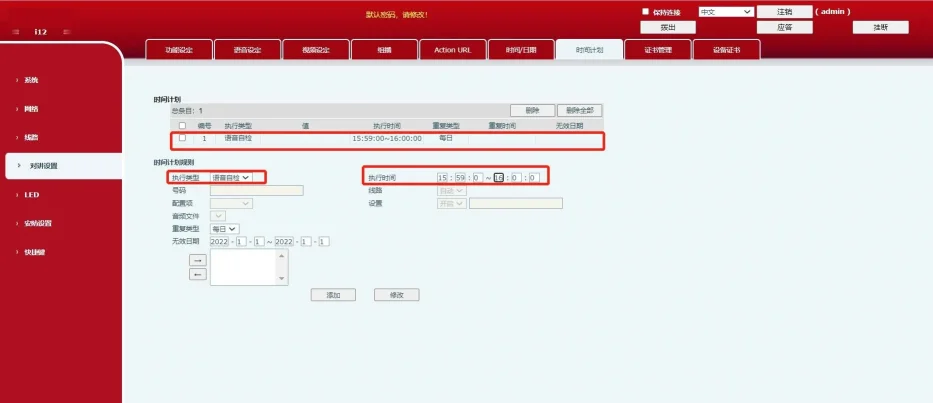
After the rule is added successfully, a new time plan entry will appear in the Time Plan section. When the scheduled time is reached, the device will automatically run the self-test.
In a public network environment, the SIP Message method works by having the server send a Message Active URI command to the device. The device replies to the Message request with 200 OK. It then sends a Message Response containing the self-test result back to the platform, and the platform replies with 200 OK.
1. Register the device account on the server.
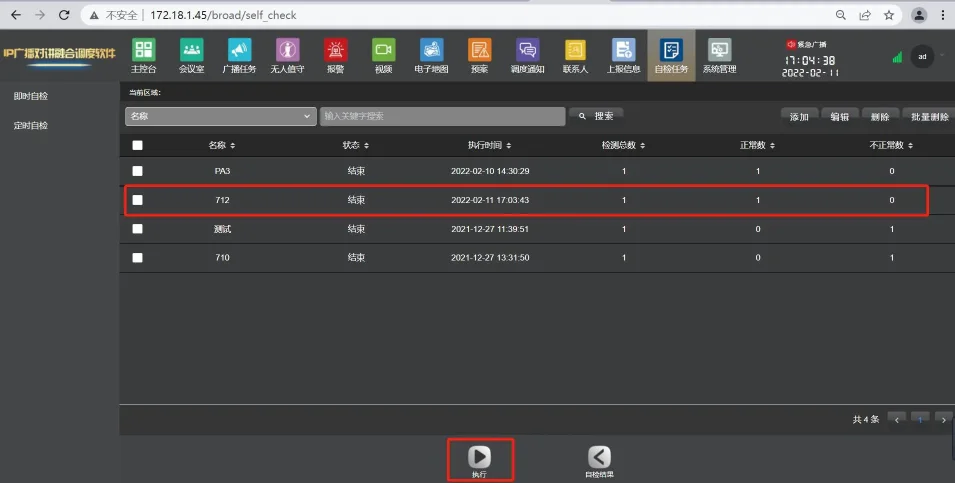
2. Create a self-test task on the server. In this example, the Yunyi server is used. Log in to the Yunyi server web interface, go to Self-Test Task --- Add, and create a new self-test task.
3. After the task is added, select the task and click execute. If the device speaker and microphone are connected and working properly, the task will complete successfully. If the speaker or microphone is disconnected or damaged, the execution will fail and the server interface will show an abnormal status. You can also go to Self-Test Result in the server web interface to view the result directly.
You can also verify whether the self-test succeeded or failed by capturing packets on the device. Before starting the self-test, log in to the device web interface, then go to System --- Tools --- Network Packet Capture, and click Start.
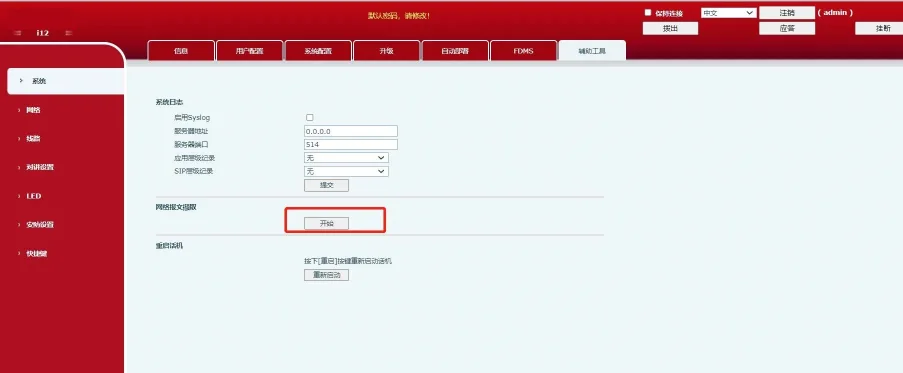
After the self-test is complete, click Stop in the device web interface. Open the captured packet file in Wireshark and filter by sip. In the MESSAGE packet, if you see the field Success, the self-test was successful. If the result shows Fail or Failure, the self-test failed.
